Deploy a Windows Server with a Azure DevOps Pipeline

Deploy a Windows Server with a Azure DevOps Pipeline

Azure Pipelines supports continuous integration (CI) and continuous delivery (CD) to continuously test, build, and deploy your code. In this post I am deploying a windows server using Azure Devops pipeline, connect Azure Devops to a subscription with a service principle.

To follow along you will need a Azure subscription. Signup link for Auzre .Next you will need is a Azure Devops account sing up for Azure Devops.

Create Azure Devops Organization

Sign in to your Azure Devops using the devops.azure.com and follow below steps or refer How to Create an Organization for detailed steps .

  1. Click on the New Organization link and create your organization and navigate to your project.
  2. Click on Continue when prompted for Terms and Conditions In the screen that appears, enter a name of the organization, location, and the captcha challenge.
  3. Then click on Continue.

Create New Project

After the organization has been created, you will also receive an email confirmation of the same and will be redirected to the page where you can create a new project follow below steps or refer How to create a project for detailed steps.

  1. Click on new project on the top right of you screen.
  2. Enter project name, choose the visibility to private. Click on Create Project.
  3. You will then be redirected to the organization dashboard showcasing the new project.
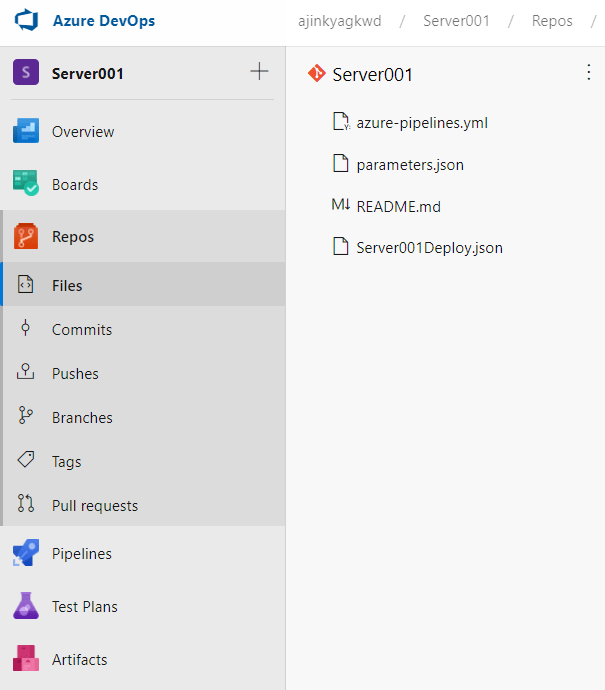
Project Dash Board

Repos

The repository is where all of the project’s configuration files are kept. Repos can be cloned to different editors. To clone repositories to VS Code, you must have both VS Code and Git installed on your machine. For the time being, we will modify in devops, so click on initialize. After it has been initialized, you can add a template file. You can make use of a pre-existing ARM template. You can also download the template I used from here. To make and changes to devops files he you will have to click edit makes changes and click Commit to save your file.

  • To add a template file, create a new file called Server001Deploy.json.
  • Copy and paste the code.
  • Then click the commit button to save the template file. If you like, you may leave a remark.
  • Next create a new file name it as parameters.json
  • Copy paste the code
  • To update the parameter file update the value for adminUsername, adminPassword and dnslabelPrefix.
  • Enter value of your choice and click commit to save the file.
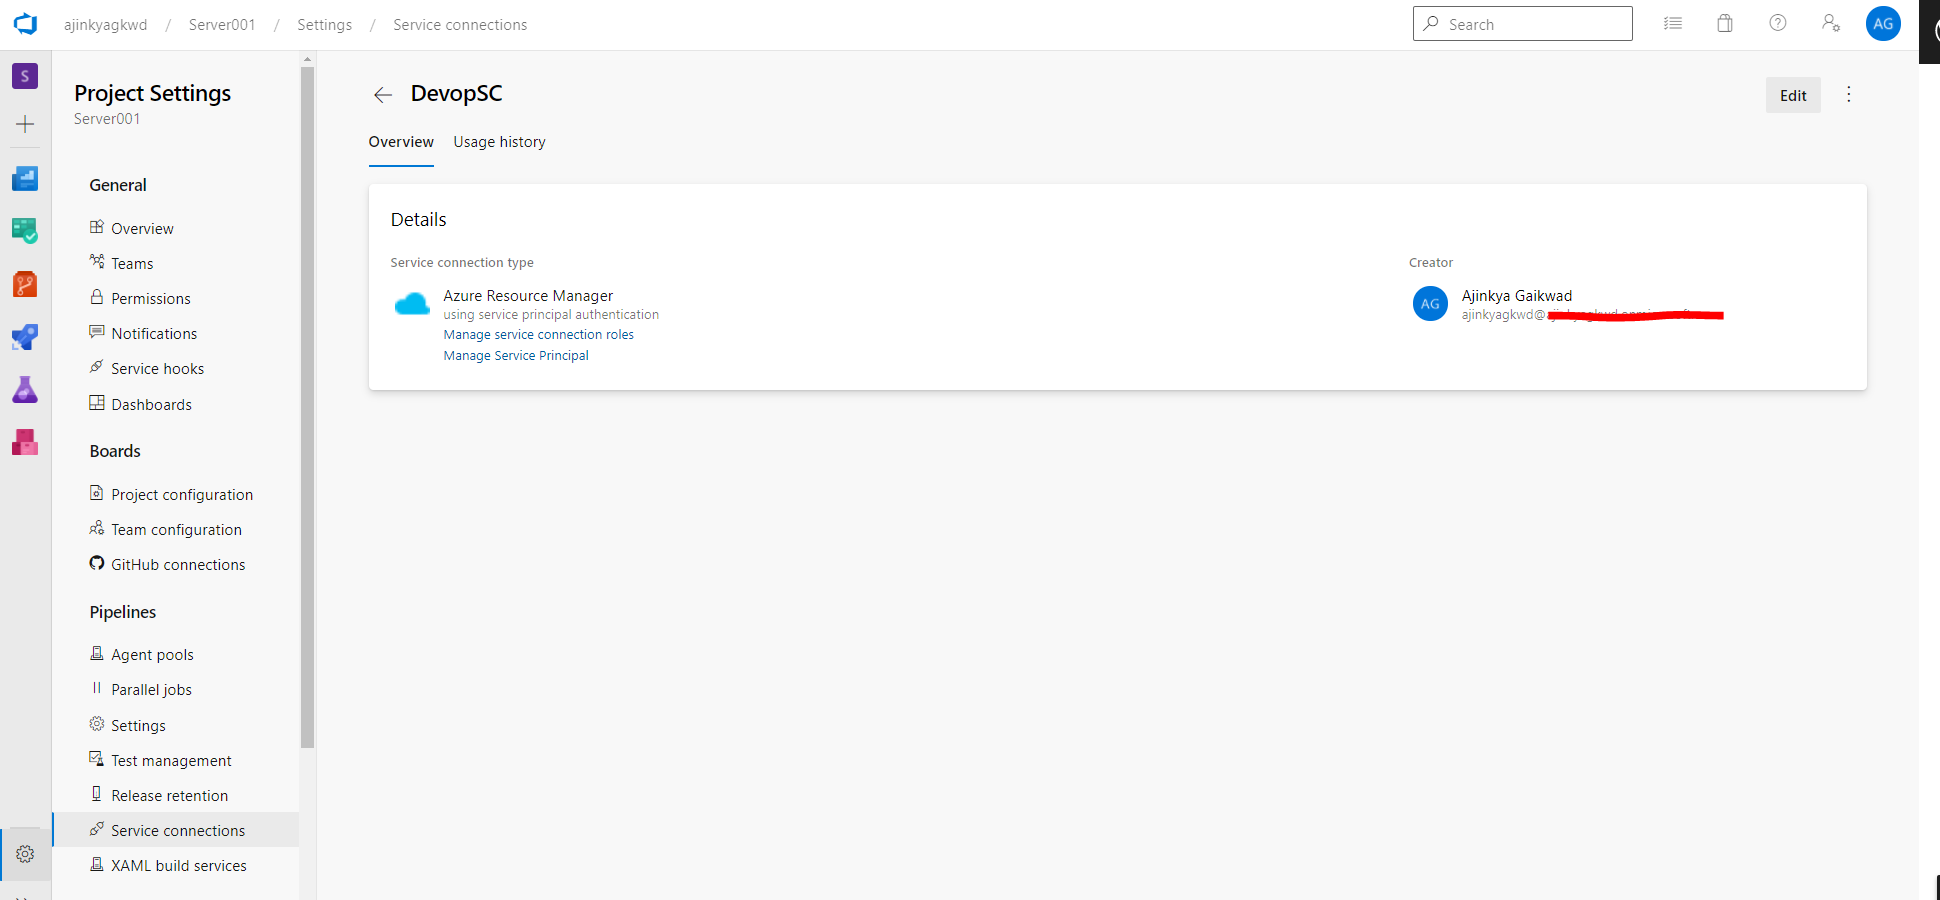
Repository

Service Connection

A service connection is a service principal that acts on devops behalf to manage and deploy resources in your azure subscription. Visit Manage service connection for detailed information and steps.

  1. Go to project settings which is at the bottom on the left.
  2. Go to Service connections and click on create service connection There a lot of option available for this project we will use Azure Resource Manager and click next.
  3. Select Service principal automatic and click next.
  4. Once prompted to authenticated you will have to enter your account login in order to authenticate.
  5. You can select a resource group we will leave it blank because we need to create a new resource group for this deployment.
  6. Enter a name and description for your service connection.

Pipeline

  • Go back to repo and click Setup build 
  • Select starter pipeline. 
  • Delete eveything underneath steps: 
  • Click on show assistan on top right and dearch ARM Template Devployment. 
  • Set settings as below   
    • deploymentScope: ‘Resource Group’
    • azureResourceManagerConnection: ‘DevopSC’   
    • subscriptionId: ‘Select a avilable subsctiption’   
    • action: ‘Create Or Update Resource Group’
    • resourceGroupName: ‘LearnDevops’   
    • location: ‘Australia East’   
    • templateLocation: ‘Linked artifact’   
    • template: ‘Server001Deploy.json’   
    • template parameter: ‘parameters.json’   
    • deploymentMode: ‘Incremental’   
      • Advance:       
      • deploymentName: ‘Server001Deploy’ 
  • Click Add 
  • Click Save and Run add a commit message and click Save and Run.

Running jobs in pipeline
Status if the completed job
Simple VM Deployed and is run

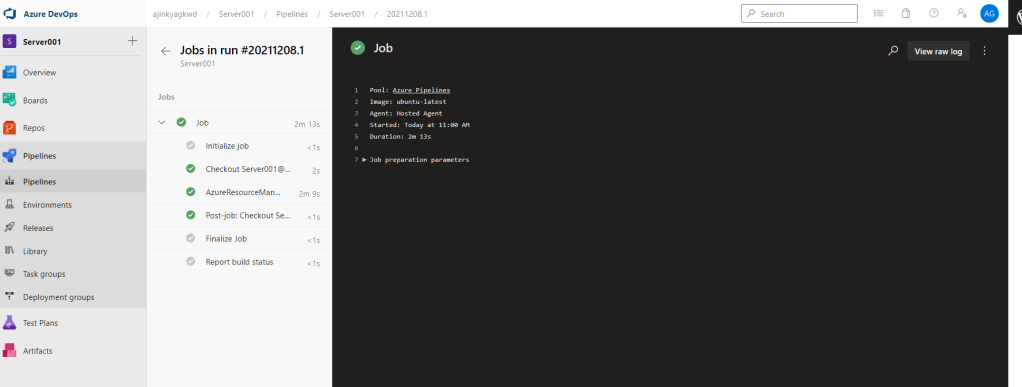
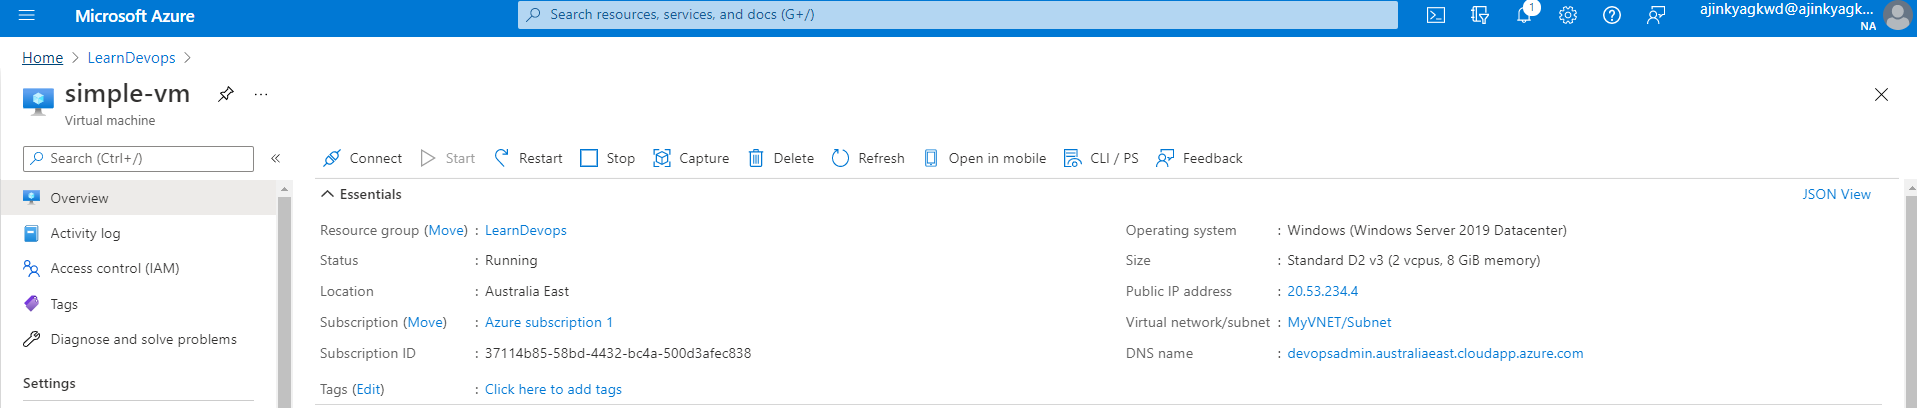
Once the deployment is successfully completed try connecting using RDP and local admin password.

Note: Do not forget to delete or deallocate the server to prevent charges.

Summary

We deployed simple server using ARM template and devops pipeline. Azure Pipelines are used to deploy your code to multiple targets. Targets include virtual machines, environments, containers, on-premises and cloud platforms, or PaaS services.

Deploying Azure VM using Terraform

Create an Azure VM using Terraform.

Terraform is currently one of the most popular infrastructure automation tool to manage multi cloud environment. This blog post will show case using Terraform to create a resource and Virtual Machine in Azure.

This configuration file will create following resources in Azure.

  • 1. Resourcegroup
  • 2. Virtual Network
  • 3. Subnet
  • 4. Network Security Group
  • 5. Virtual Machine

mian.tf

terraform {
  required_providers {
    azurerm = {
      source = "hashicorp/azurerm"
      version = ">=2.6"
    }
  }
}

provider "azurerm" {
    version         =   ">=2.6"
    client_id       =   "var.client_id"
    client_secret   =   "var.client_secret"
    subscription_id =   "var.subscription_id"
    tenant_id       =   "var.tenant_id"
    
    features {}
}


resource "azurerm_resource_group" "rg" {
   name                  =   "LearnTerraform"
    location              =   var.location
    
}


resource "azurerm_virtual_network" "vnet" {
    name                  =   "LearnTerraform-Vnet"
    resource_group_name   =   azurerm_resource_group.rg.name
    location              =   azurerm_resource_group.rg.location
    address_space         =   [var.vnet_address_range]
    
}

resource "azurerm_subnet" "web" {
    name                  =   "LearnTerraform-subnet"
    resource_group_name   =   azurerm_resource_group.rg.name
    virtual_network_name  =   azurerm_virtual_network.vnet.name
    address_prefixes      =   [var.subnet_address_range]
}

resource "azurerm_network_security_group" "nsg" {
    name                        =       "LearnTerraform-nsg"
    resource_group_name         =       azurerm_resource_group.rg.name
    location                    =       azurerm_resource_group.rg.location
    
    security_rule {
    name                        =       "Allow_RDP"
    priority                    =       1000
    direction                   =       "Inbound"
    access                      =       "Allow"
    protocol                    =       "Tcp"
    source_port_range           =       "*"
    destination_port_range      =       3389
    source_address_prefix       =       "10.0.1.10"
    destination_address_prefix  =       "*"
    
    }
}


resource "azurerm_subnet_network_security_group_association" "subnet-nsg" {
subnet_id                    =       azurerm_subnet.web.id
network_security_group_id    =       azurerm_network_security_group.nsg.id
}

resource "azurerm_public_ip" "pip" {
name                         = "winvm-public-    
resource_group_name          = azurerm_resource_group.rg.name
location                     = azurerm_resource_group.rg.location
allocation_method            = var.allocation_method[0]
  
}


resource "azurerm_network_interface" "nic" {
name                              =  "LearnTerraform-wimvm-nic"
resource_group_name               =   azurerm_resource_group.rg.name
location                          =   azurerm_resource_group.rg.location
   
    ip_configuration                  {
        name                          =  "wimvm-nic-ipconfig"
        subnet_id                     =   azurerm_subnet.web.id
        public_ip_address_id          =   azurerm_public_ip.pip.id
        private_ip_address_allocation =   var.allocation_method[1]
    }
}

resource "azurerm_windows_virtual_machine" "vm" {
  name                              =   "LearnTerraform-winvm"
  resource_group_name               =   azurerm_resource_group.rg.name
  location                          =   azurerm_resource_group.rg.location
  network_interface_ids             =   [azurerm_network_interface.nic.id]
  size                              =   var.virtual_machine_size
  computer_name                     =   var.computer_name
  admin_username                    =   var.admin_username
  admin_password                    =   var.admin_password

    os_disk  {
        name                          =   "winvm-os-disk"
        caching                       =   var.os_disk_caching
        storage_account_type          =   var.os_disk_storage_account_type
        disk_size_gb                  =   var.os_disk_size_gb
    }

    source_image_reference {
        publisher                     =   var.publisher
        offer                         =   var.offer
        sku                           =   var.sku
        version                       =   var.vm_image_version
    }

    
}

variables.tf

variable "client_id" {
    description =   "This is the application id from the service principal in Azure AD"
    type        =   string
}

variable "client_secret" {
    description =   "This is the secret for the service principal in Azure AD"
    type        =   string
}

variable "subscription_id" {
    description =   "The guid for the subscription id"
    type        =   string
}

variable "tenant_id" {
    description =   "This is the tenant id for your Azure AD instance"
    type        =   string
}

# Resource Group

variable "location" {
    description =   "Location of the resource group"
    type        =   string
    default     =   "australiaeast"
}

# Vnet and Subnet

variable "vnet_address_range" {
    description =   "IP Range of the virtual network"
    type        =   string
    default     =   "10.0.0.0/16"
}

variable "subnet_address_range" {
    description =   "IP Range of the virtual network"
    type        =   string
    default     =   "10.0.1.0/24"
}

# Public IP and NIC Allocation Method

variable "allocation_method" {
    description =   "Allocation method for Public IP Address and NIC Private ip address"
    type        =   list(string)
    default     =   ["Static", "Dynamic"]
}


# VM 

variable "virtual_machine_size" {
    description =   "Size of the VM"
    type        =   string
    default     =   "Standard_B1s"
}

variable "computer_name" {
    description =   "Computer name"
    type        =   string
    default     =   "Win10vm"
}

variable "admin_username" {
    description =   "Username to login to the VM"
    type        =   string
    default     =   "winadmin"
}

variable "admin_password" {
    description =   "Password to login to the VM"
    type        =   string
    default     =   "P@$$w0rD2021*"
}

variable "os_disk_caching" {
    default     =       "ReadWrite"
}

variable "os_disk_storage_account_type" {
    default     =       "StandardSSD_LRS"
}

variable "os_disk_size_gb" {
    default     =       128
}

variable "publisher" {
    default         =       "MicrosoftWindowsDesktop"
}

variable "offer" {
    default         =       "Windows-10"
}

variable "sku" {
    default         =       "rs5-pro-g2"
}

variable "vm_image_version" {
    default         =       "latest"
}

output.tf

output "resource-names" {
    description     =   "Print the names of the resources"
    value           =   {
        "Resource-Group-Name" =  azurerm_resource_group.rg.name
        "Vnet-Name"           =  azurerm_virtual_network.vnet.name
        "Subnet-Name"         =  azurerm_subnet.web.name
        "NSG-Name"            =  azurerm_network_security_group.nsg.name
        "NIC-Name"            =  azurerm_network_interface.nic.name
    }
}


output "public_ip_address" {
    value           =   azurerm_public_ip.pip.ip_address
}

output "vm_login" {
    description     =      "Credentials to login to the VM"
    
    value           = {
        "VM-Name"   =   azurerm_windows_virtual_machine.vm.name
        "Username"  =   azurerm_windows_virtual_machine.vm.admin_username
        "Password"  =   azurerm_windows_virtual_machine.vm.admin_password
    }  
    sensitive= true
}

In this article I learned to develop terraform configuration file and deploy Azure resources.